Hello all. It is finally time to start on the kernel. Unfortunately, this entire post will be how to set up a development and debugging environment. I won’t force you to follow along here, but you won’t have the easiest time writing kernel code if you don’t set up your environment properly.
I will warn you. This will suck. I will share what works for me, but your setup might be entirely different. You may even have to change some sysinternal settings to get everything to work. Google-fu your heart out, or maybe ChatGPT can help you.
What you will need:
A Windows 10 ISO
11 might work, but I will be using 10 22H2.
VM hosting software
I will use VMWare Workstation, but VirtualBox should suffice as a free option.
Microsoft Visual Studio 2022
2019 probably works.
Requires
C++ workload with these optional/individual components
You might be able to install this from the Visual Studio Installer Individual Components tab.
MSVC v143+ Spectre-mitigated libs and build tools
Found in the Visual Studio Installer Individual Components tab.
WinDbg
Can be found in the Microsoft store as WinDbg Preview.
If you already have a “dirty” Windows VM from the RTMA series, I would advise against reusing it for this. You’ll be able to keep things separate and won’t have to worry about dancing around snapshots.
Getting a Windows ISO
Firstly, head here. Next, in order to skip Microsoft’s dumb installation software, you can change your user agent to a mobile device. I use Brave browser and I followed these instructions. Once you change your user agent, refresh the page, and download an x64 version of Windows 10 22H2 in whichever language you want. It’s about 5.7GB in size. Don’t forget to change your user agent back to default.
Once you have your Windows ISO, you can then create a VM with that image.
You can develop and debug on your own machine. However, it is much more efficient to create a VM to run your drivers on. That way, if you BSOD, you only crash within the VM and not your main machine.
Setting up the VM
Create a new VM using the ISO you just installed. I chose Windows 10 Pro as my version. Ignore the product key. Then finish creation. You will add some options later.
Go ahead and add a shared folder to save yourself a headache in the future. Make sure it’s always enabled.
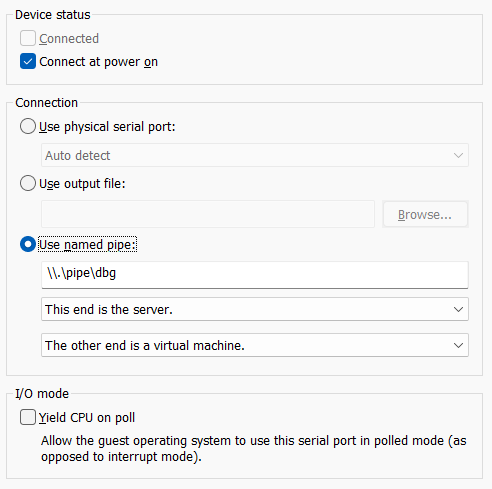
Next, add a serial port. The serial port will be used to debug from the host machine. This way, you’ll be able to catch crashes and debug without worrying about BSODing yourself.
Once you create the serial port, set it the connection as a named pipe where “this end is the server” and “the other end is a virtual machine”. Set the name to something like \\.\pipe\dbg. Remember what port number you’re given. Odds are, it’s 1.
We will come back to this later to set up WinDbg.
Restart the machine. If you get a popup about there being no serial connection, ignore it and/or click yes.
Open an Administrator command prompt and enter these:
>bcdedit /set testsigning on
>bcdedit /debug on
>bcdedit /dbgsettings serial debugport:1 baudrate:115200
The first is to create and run drivers that aren’t signed. The second and third are to enable debugging. Your serial port may not be 1. Your VM host will tell you what serial port your debugger will run on.
After this. Restart the VM.
Sometimes
debugtypewill revert back to local. If this happens andbcdedit /dbgsettingsspews thatdebugtypeis local, repeat the third command.
You’ll know test signing is on if you see this in the bottom right-hand corner of the VM screen:
Now, you’re finally ready to debug.
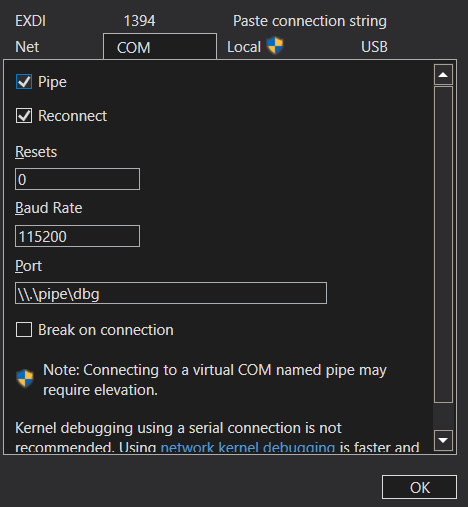
Open up WinDbg on the host machine. Go to File > Attach to Kernel, then click the COM port tab. Check off Pipe and Reconnect. You can check off Break on connection if you want. Set the Baud Rate and Port to the name you gave it earlier.
Click OK and the debugger should be ready to start debugging. If the VM is still running and the debugger doesn’t latch onto it, restart the VM. This should allow the debugger to start debugging the VM on boot, although this may slow the boot time. Also, the debugger might just hang and wait for a reconnect. If you click break, it may trigger a connection.
Now that your debugger is working, I would highly advise taking a snapshot of your VM at this point in time. Don’t forget to continue/stop debugging first.
Thus concludes kernel mode setup. It seemed silly to stick these instructions behind a paywall, so this post is free. The remainder of the Kernel Mode series won’t be, so be on the lookout.
Thanks for reading and have a Happy New Year!
Go!
-BowTiedCrawfish


