Hello all, and welcome back to the Autist’s Guide to Malware Analysis. I’ve been quite busy this week with both finals and writing the program we are to reverse engineer in this post. Did you know that HTTP requests are a pain in the ass to do in Windows C++? I learned that the hard way.
Anyways, this post will discuss behavioral analysis. This also builds off of last week’s post on triage. Think of it like “step 2” of the malware analysis process.
Behavioral analysis is quite literally the analysis of a program’s behavior. It is a more specific form of dynamic analysis where the program’s behavior is being inspected while it is being run. You are looking for noticeable changes, namely internet connections, process creation, file changes, and registry manipulation.
“But how do I look for these things?” you may ask. The answer is tools! Yes, there are a bajillion tools that you can use for inspecting these behaviors. We will discuss these tools and use one of them in our malware specimen walkthrough.
For internet/packet sniffing, there is Wireshark and Fiddler. We will use Wireshark in today’s walkthrough. If you’ve read BowTiedCyber’s Wireshark post, you should already know how to use it, right? For processes, there’s Windows’ Procmon, What’s Running, and ProcDot. For registry, Regshot.
You don’t need all of what’s listed above, just at least one of each behavioral section. Play around with it, and find which one is your favorite.
Got what you need? Okay, let’s go!
If You Want to Successfully Follow Along
Please note that I have set up my environment to satisfy what the malware is trying to do. My registry will surely be different than yours. I have WinSCP installed with the registry keys set up for the malware to work.
For those that don’t know. WinSCP is an FTP program that allows file transfer to “sites”. These sites can be saved on your machine for quick access rather than typing out login information over and over. Sites are stored in the Windows Registry.
If you want to follow along and have the malware actually work to the point where you can reproduce what happens in this walkthrough, you will need to install WinSCP on the system that you are analyzing the malware in. Upon running it, go to Session/Sites/Site Manager…. Create a new site with whatever username, whatever hostname, and whatever password. Make sure you save the password. Once that is done, you should be prepped for analysis.
Grab the “vulture” .zip on my Tor site here. Password is “btcrawfish”. I highly, highly encourage you to try and reverse engineer it without looking at this walkthrough. It shouldn’t be hard, but don’t be discouraged if you get stuck trying to figure out what it does (plus the source code is right there).
So first step, property analysis. Let’s toss this bad boy into PeStudio and see what we can find.
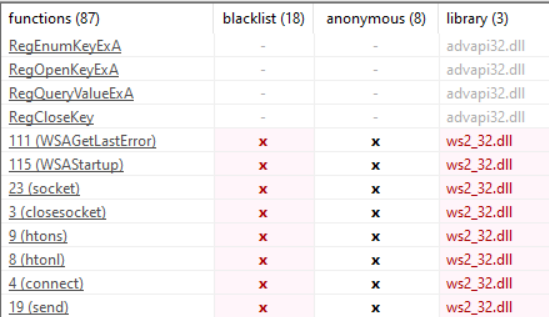
ws2_d32 and advapi32. So, we’ve got socket connections and advanced API. Advapi is huge, so we can’t spitball theories simply based on it being imported. I tried to use HTTP but holy shit that was a lot of effort, and I never got it to work. So you’re stuck with socket connections for a while until I can figure that out.
Here are our function imports. Once again, PeStudio flags our socket functions because those definitely aren’t suspicious or anything. It’s a client connection, so we know that information is being sent from this machine elsewhere.
Our advapi functions pertain to the Windows Registry. I will do a post on the fundamentals of the Windows Registry, but for now think of it like a big key/value database that sits on your computer that programs can access. It stores a lot of information.
PeStudio doesn’t flag these functions. Just because a program is reading (not even writing, there are no write functions in this specimen) registry values, it does not mean it is inherently malicious. Most all programs you use daily use the registry (think user configurations and other local data).
We could check strings for keys in the registry that the program accesses, but that may take a while considering we don’t know what kind of keys the program could be looking for.
We’ve got our theories. It appears that this malware is reading some sort of information from the registry and sending it elsewhere. We must inspect what it is reading. Let’s start statically to figure this out.
The first thing that I would look for would be registry functions to see if I can see the keys that the program is accessing. And looky looky:
This is first key that I see that the program is trying to open with RegOpenKeyEx.
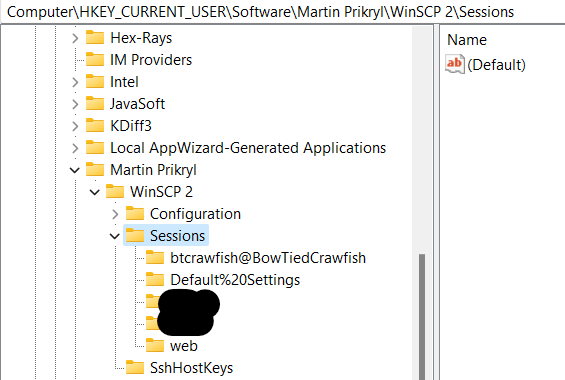
Let me open that up my registry and inspect the found key with regedit.
Quick registry crash course. The registry is a hierarchical database built much like a file system. To reach the key that the malware is trying to open, we must navigate to it.
There are 5 main root keys (called hive keys). So, how do we know which one the malware opens? RegOpenKey tells us. The first parameter (0x80000001) points to HKEY_CURRENT_USER. So, let’s just pull the string.
(Ignore the blacked out ones, slight dox :))
In this key, we see subkeys, meaning the malware sees this as well.
We need to figure out what the malware does from here, and cross-reference back at what we’re looking at in regedit. We can step through it dynamically, but let’s see if we can do it statically.
I’m cheating and using Hex-Rays’ decompiler to speed up the process, Ghidra should also decompile it fairly easily.
RegOpenKeyEx returns 0 (ERROR_SUCCESS) on success. So if that’s successful, the program begins to iterate subkeys (RegEnumKeyEx) and then opens them.
After opening these subkeys, it queries the keys “HostName”, “Password”, and “UserName” for their values (RegQueryValueEx). Let’s inspect these keys in our registry.
Uh-oh. Looks like the malware was able to grab all of this information. So what does it do with it?
We can try deciphering that information statically, but that’ll take some time. They might have a password, so let’s kick into incident response mode!
We already know that the specimen uses socket connections. We can be almost sure that the username, hostname, and password are being sent through this connection, so let’s prove it.
To do so, we shall finally begin our behavioral analysis. Socket connections use the internet, so we can use a packet sniffer to see what’s getting sent. To inspect this behavior, we need to “detonate” the malware or run it raw.
Obviously, in a real situation, make sure you are using a sandbox with host-only network connections. To properly inspect network connections, you should use something like fakedns or accept-all-ips. In this example, the malware connects to localhost with the listener.py script. Make sure you are running the listener.py before you run the malware, else the following will not work properly.
Since we know internet is being used, we can sniff it with Wireshark. So let’s launch it and start capturing before we detonate the malware. Note that since the malware uses a localhost connection, we have to capture on the loopback address.
If we we wanted to be even cooler, we can filter out what we know won’t be in our packets.
Looks like a port number there.
Ready to capture.
Run the malware, and…
TCP connections to localhost. Remember that there’s a 3-way handshake with TCP, so the first 3 packets are just acknowledgements (ACK). The 4th packet is larger than the others, let’s take a gander.
You know, that looks awfully similar to what we saw in the registry, don’t you think? Scroll up if you don’t believe me.
Looks like the hostname, username, and password is being sent to a remote server. That’s not good.
Now, I’m sure you noticed, but that is one hellacious password. Excellent awareness on your part. That password is encrypted. But if you have read my encryption post, you know that what is encrypted can be decrypted. If you have the hostname and the username of the site, then you can decrypt the password.
I downloaded a decrypting program from here. And I’ll run it.
And the password is bananabread. Yum!
Tidbits
That’s just about it for this malware, but there are some things that I do want to point out that you might want to know for future analysis.
I bet you saw all of this and said “what the hellllll?”. I know, it looks confusing at first, but let’s break it down.
Firstly, this function:
This is an std::string constructor, but Windows likes to wrap over everything, so it’s stripped. Looking at its decompilation produces this:
std::string::assign is a nice hint here. And we can rename it (with N on IDA).
Next is these 2 functions sub_401AC0 and sub_401A80:
std::string::append is another hint. This is the “+” overload for std::string + char* concatenation. sub_401A80 is completely hellacious to reverse engineer, just take my word for it that it is the “+” overload for 2 std::string types.
sub_403950 is the std::string destructor.
After rename those functions, this code block makes a bit more sense. Although it would be a lot simpler to just step through it with dynamic analysis.
It looks like IDA failed to figure out how the string appending worked. Strange. v33 is the main std::string but under the pseudocode, it is never appended to. IDA (at least, 7.6 and below) does not seem to like standard library templates.
Last tidbit:
This is the sockaddr_in structure. If you remember the dynamic analysis post, we discussed how IP addresses can be deduced from the inet_addr function. I opted to not include it in this post and use the 32-bit int version of the IP. 4 bytes, each for a octal in an IP address. 7F is 127, and 01 is 1. Thus the IP is 127.0.0.1.
That’s all I’ve got for this post. It is a lot, I know. Beyond hating WinHttp, I actually had a lot of fun doing this post, so I hope that you have fun doing the walkthrough!
Go!
-BowTiedCrawfish


